
我制作了一个openclaw的容器镜像,接下来交大家如何进行安装。
一,快速安装 Docker(若未安装)
# CentOS
yum install -y yum-utils
yum-config-manager --add-repo https://download.docker.com/linux/centos/docker-ce.repo
yum install -y docker-ce docker-ce-cli containerd.io
systemctl start docker && systemctl enable docker

# Ubuntu/Debian
apt update && apt install -y docker.io
systemctl start docker && systemctl enable docker
二,核心部署步骤
步骤 1:拉取 OpenClaw 镜像
docker pull zxc2041299467/openclaw:final步骤2:启动 OpenClaw 容器
docker run -d \
  --name openclaw \
  --restart unless-stopped \
  -p 7700:18789 \
  -v openclaw_data:/root/openclaw \
  -v openclaw_config:/root/.openclaw \
  openclaw:final
三、基础验证与使用
# 查看容器状态(显示 Up 即为正常)
docker ps | grep openclaw
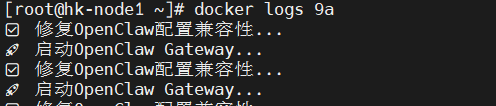
# 查看容器日志(确认网关启动)
docker logs openclaw
正常日志输出示例:
临时访问地址(HTTP,仅测试用)
http://服务器IP:7700/#token=你的Token 默认token是wsnedd
四、HTTPS 部署(公网访问必配)
OpenClaw 要求公网访问必须用 HTTPS,否则会报 pairing required/origin not allowed,以下是 Nginx 反向代理方案:
步骤 1:安装 Nginx
# CentOS
yum install -y nginx

# Ubuntu/Debian
apt install -y nginx
步骤 2:申请免费 SSL 证书 建议阿里
阿里云SSL证书申请流程【图文教程】免费白嫖20张HTTPS证书 – 知乎
步骤3:配置 Nginx 反向代理
创建 Nginx 配置文件:
vi /etc/nginx/conf.d/openclaw.conf粘贴以下配置(替换 你的域名 为实际域名或者ip):
# HTTP 自动跳转 HTTPS
server {
    listen 18789;
    server_name 你的域名;
    return 301 https://$host$request_uri;
}

# HTTPS 核心配置
server {
    listen 443 ssl;
    server_name 你的域名;

    # SSL 证书配置
    ssl_certificate /data/ssl/证书名.pem;
    ssl_certificate_key /data/ssl/证书名.key;

    # SSL 优化
    ssl_protocols TLSv1.2 TLSv1.3;
    ssl_ciphers ECDHE-RSA-AES256-GCM-SHA512:DHE-RSA-AES256-GCM-SHA512;

    # 反向代理到 OpenClaw 容器
    location / {
        proxy_pass http://ip:7700;
        proxy_set_header Host $host;
        proxy_set_header X-Real-IP $remote_addr;
        proxy_set_header X-Forwarded-Proto $scheme;

        # WebSocket 必需配置
        proxy_http_version 1.1;
        proxy_set_header Upgrade $http_upgrade;
        proxy_set_header Connection "upgrade";
        proxy_read_timeout 86400;
    }
}
步骤 4:重启 Nginx 并开放端口
# 验证配置语法
nginx -t

# 重启 Nginx
systemctl restart nginx && systemctl enable nginx
步骤 5:添加 HTTPS 地址到白名单
查看你容器的持久化目录
docker volume inspect openclaw_config
找到openclaw.json编辑
vim openclaw.json

在 gateway.controlUi.allowedOrigins 中添加 HTTPS 域名
# 重启容器 docker restart openclaw步骤 6:设备配对(解决 pairing required)
# 进入容器查看待配对请求
docker exec -it openclaw openclaw devices list

# 批准待配对请求(替换为实际 Request ID)
docker exec -it openclaw openclaw devices approve 你的RequestID

# 验证配对状态
docker exec -it openclaw openclaw devices list
五、最终访问
配置完成后,访问以下地址即可正常使用:
https://你的域名/#token=你的Token
常见问题排查
- origin not allowed:检查
allowedOrigins是否包含访问的 HTTPS 域名,且协议 / 端口完全匹配; - pairing required:执行
openclaw devices approve <Request ID>批准待配对请求; - 网关离线:确认 Nginx 配置中 WebSocket 项未缺失,容器内网关进程正常运行;
- 权限不足:给
/data/openclaw目录赋权chmod -R 755 /data/openclaw。
No Comments